
I couldn't find a free pattern for what I was after. I can't really afford to buy lots of girls patterns, seeing as I have two boys and will never get much use out of them.
Here is the dress I came up with.

Instead of puchasing a pattern, I decided to have a go at making one myself. This style really only needs a simple bodice pattern.

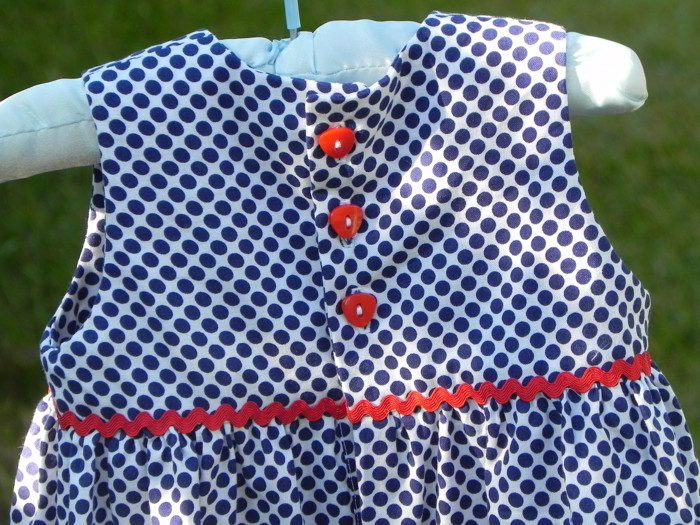
I handsewed on a line of ric rac and a ric rac flower. I love this dress! :)

The book I used to draft this pattern can be found on Book Depository*, I think it is really good. I got lazy on the final dress, but I originally planned to have the back of the skirt to open completely with buttons. Here is a practice dress, that I ended up gifting to a friend because it turned out to be a good fit.


I will be releasing more free patterns too! I will be putting the pattern testing call out on the Sew Jereli Facebook page, so come over and like the page for updates :)
Click the link to download the free baby dress pattern.
Note: I tried this on my 16month old and it did still fit, though getting on the snug side :) It was more of a tunic length haha.
Also! Please check out my free Pajama Pants Pattern in sizes 18months to 5 years. It would be a perfect gift for an older brother or sister of the new bub :)
Baby Dress Tutorial Size 6 - 12 months
Cut list:
- 1 front bodice on fold - main fabric
- 1 front bodice on fold - lining fabric
- 2 back bodice - main fabric
- 2 back bodice - lining fabric
- 1 piece main fabric for skirt - 14.5" by the width of fabric
- 2 strips interfacing 2" x 6.5"
- Button placket skirt - 2 strips light fusible interfacing 1" x 13"
- Part opening skirt with placket - Piece of main fabric measuring 7" by 2.5"
Seam allowances:
Hem and button placket 1" double fold
Top of skirt and bottom of bodice 1/2"
Rest of the bodice, 3/8" or 1cm
Directions
There are two options for the skirt, please choose one.
Skirt Option 1 - Button placket opening
- Iron the 2 short sides of the skirt in 1inch. Fold and press again for a double fold 1" placket. Place the 1" strip of interfacing glue side down in the crease guide that you just made, refold and press to adhere. Sew the placket closed, close to the edge.

Skirt Option 2 - Part opening
- Sew the two short ends of the skirt piece together with your preferred seam allowance, stopping and back stitching approximately 3.5" from the top. This will form a tube. You can leave this seam as is, simply pressing the seam allowance flat, and attaching the bodice. Or alternately, you can follow this great tutorial and make a placket, similar to the one featured on this baby dress.
Skirt Hem
- Make a double fold hem for the bottom of the skirt by ironing up 1" twice, same as the placket. Sew the hem. Sew gathering stitches at the top of the skirt ready for later. Alternately, you can fit approximately eight 1inch pleats, 4 in front and 4 in back.
Bodice
- Sew the shoulder seams, lining to lining and main fabric to main. Press seams open. Press the bottom of the bodice up on the wrong side about 3/4" or 1cm, this is just to make a nice crisp guide to use later on when attaching the skirt and enclosing the seams.

- Place the lining and main fabric bodice right sides together. Sew around the armhole seams (not the side seams). Starting and ending 1/2inch from the edge, sew up the center back, around the neck and back down the centre back. It is important to start and stop 1/2" short on the center back seams, because we will attach the skirt here.

- Clip curves, trim seams and turn right side out. Iron.
- To close the armhole, open up the two sides and match right side together, lining with lining, main with main, sew.

Attach Skirt To Bodice
- Gather the skirt or create pleats, so that the skirt length matches the length of bodice. Move the lining of the bodice out of the way, sew the skirt to the bodice main fabric, right sides together. In the picture you can see I am holding the lining back and matching the bodice to the skirt.

- Turn the skirt seam allowance up under the lining fabric. Here is where the guide you ironed earlier should come in handy. Pin the lining fold over the seam line you just sewed. From the outside, sew the lining closed. You can do this by carefully stitching in the ditch, or with a top stitch. You can also hand sew the lining to the skirt.

- Sew the buttons and buttonholes. Add any trims you want. You are done :
Please do not copy or redistribute this pattern, but direct others to this page.
:) x
*Affiliate Link
This is so adorable! I am always in need of sweet baby dresses! Very cute! What a fun idea! Thanks for sharing! I’d love for you to visit us at Get Your Crap Together!
ReplyDeletehttp://getyourcraptogether.blogspot.com/
Toni, thanks so much for posting this. You've done such a great job on it, and the dresses are beautiful! I love the little ricrac flower embellishment - so cute. I have a couple of minor suggestions: it might be good to put your blog address on the actual pattern, so folks can refer back to the instructions & pictures when making the dress, just in case they are like me, and they download a pattern months before they actually get around to sewing it, and can't remember where they got it from. The other suggestion is to make the 1" block an outline, rather than a solid black block, to conserve ink. Thanks again...it's very sweet of you to share!
ReplyDeleteThank you so much Laura, the pattern has been updated to include your valuable suggestions :) x
DeleteGorgeous Toni. Thanks for the pattern too (by the way, I found this post of yours via Craftgossip. Well done on the feature!
ReplyDeleteI've discovered you via Sew Many Ways, and you have now a new follower!!
ReplyDeleteAll your dresses are beautiful, Toni!! Thanks for sharing the pattern!! And I love upcycling too, like you say in other posts!! I've recently started running a blog too, my work doesn't look so professional like yours, but maybe you would like to take a look at it...
Greetings from Spain!
Ingrid
Thanks for the pattern!! I really appreciate the time and effort you put into it. If you ever draft it in bigger sizes, I would love to purchase it from you. :) I am now a follower of you!
ReplyDeleteVery sweet little dress! I love it!
ReplyDeleteSo cute, almost makes me wnt another baby...my husband just died a little!
ReplyDeleteReally cute dress!
ReplyDeleteWhat a cute little dress. I featured it here:
ReplyDeletehttp://sewprettysewfree.blogspot.com/2013/04/baby-dress-free-sewing-pattern.html
What an adorable little dress and well done on drafting it yourself!!! Red is the perfect contrasting colour for the ric rac and buttons. I would love you to share this at our ongoing linky that's just for Girls' Dresses
ReplyDeleteHi Toni,
ReplyDeleteThanks for the adorable pattern! I found sock monkey fabric and added rick rack - it looks adorable on my granddaughter. VM
Hii Toni,
ReplyDeletethank you so much, for this great Tutorial an pattern!
Greatings from Germany,
Klaudia
Lovely dress Toni! Will have to have a look at how you draft your patterns!!
ReplyDeleteSo lovely, thank you! I started making it thinking it would look amateur but I am so proud of what I have just created!
ReplyDeletei love it. nice dress
ReplyDeletewww.lovelykidzshop
Hi there! THANK YOU for the adorable pattern!! Made it into a dress for my grand daughter to match fabrics with a dress I made for her Mom - they'll be going to the Midwest version of Comic-Con (C2E2) in Chicago this weekend and I'm sure will be the Belles of the balls!!
ReplyDeleteAn amazing and easy pattern. Width of the bottom was my only question. I figured it out and it is a beautiful dress!
ReplyDeleteWhat width did you end up using for the bottom?
ReplyDeleteWhat an adorable dress! I added to my Free pattern list today!
ReplyDeletewww.seemesew.com
hi can i use this pattern as a base for a dress that i am creating to sell? didnt know what the copyright is
ReplyDeleteHi, lovely little dress, do you do one with sleeves at all?
ReplyDeleteHi
ReplyDeleteI want to make a petticoat for my size 0 Grandaughter. May I ask if the pattern is to scale printed on A4 paper. I am new to this and thought there would be measurements. She is 9" across the shoulders.
Hi guys,
ReplyDeleteThank you so much for this wonderful article! Here we all can learn a lot of useful things and this is not only my opinion!
Even BLNCK corp. and https://boubala.com/ confirmed it!
Thank you so much for posting this so clearly. But, what is the average cost of an engagement ring? Non the less, wonderful write up!
ReplyDeleteExcellent and thoughtful end to your blogging I followed your blog with great interest. Thanks for all of the information and entertainment!
ReplyDeleteHey there just wanted to give you a quick heads up. The words in your post seem to be running off the screen in Opera. I'm not sure if this is a formatting issue or something to do with internet browser compatibility but I thought I'd post to let you know. The style and design look great though! Hope you get the issue resolved soon. Cheers
ReplyDeletekids online clothing store australia
I’m really impressed with your article, such great & usefull knowledge you mentioned here. Thank you for sharing such a good and useful information here in the blog
ReplyDeleteSocial Media Marketing Services in India
Social Media Marketing Packages in India
SEO Company in India
Google Adwords Pricing in india
Google Adwords Services in India
https://uploads.disquscdn.com/images/2c9f0ab712fa97c089eecf7ea0d888e17f64d7885a8d1ee357d01cdcf15c64ce.jpg
ReplyDelete